


Tags
.NET (42), Meetups (37), dotnetoxford (33), Git (12), Productivity (12), Career (10), LINQPad (8), PublicSpeaking (7), YearInReview (6), Docker (6), CLI (5), Testing (5), Software (4), Workflowy (4), Azure (4), BestPractices (4), Blog (4), Cake (3), Kubernetes (3), Vi (3), Snippets (3), Resharper (2), Podcasts (2), Zoom (2), Xamarin (2), Learning (2), NGINX (2), Evernote (2), Health (2), Debugging (2), DesignPatterns (2), Conference (2), CosmosDB (1), C# (1), Books (1), C# (1), AzureDevOps (1), AzureOxford (1), Aphantasia (1), IoC (1), Hackathon (1), Fonts (1), Documentation (1), dotfiles (1), OGN (1), Microsoft (1), Mocking (1), MVP (1), Neo4j (1), Wyam (1), TimeTracking (1), Powershell (1), RemoteWork (1), Security (1), Serilog (1)Playing with a Dockerised ASP.NET Core
Whilst I've used Docker in the past, it has only really been for development and prototyping - mainly to host 3rd party software - eg. MongoDB, Neo4j, etc. I've tended to have my webapp itself outside of Docker - partly due to not using the Core version of ASP.NET, which isn't cross platform. So I decided it was about time I had a go at setting up ASP.NET Core in Docker! It turns out that this is actually extremely easy!
When I last used Docker, the Docker for Windows story wasn't great, so I ended up using Vagrant to spin up a Linux VM, and run Docker from there instead. Thanks to Vagrant's Forwarded Ports, this still meant I could access these services from my local browser using localhost, so this worked really nicely. However, I've just tried again using Docker for Windows, and it looks like this has greatly improved, so in this post, I won't use Vagrant, but will follow up with a post showing how to add Vagrant to the mix for those having trouble with Docker for Windows, or not having Hyper-V support in their version of Windows.
First, a few assumptions ...
This post assumes you already know what both Docker and ASP.NET Core is, so won't go into descriptions of what images and containers are, or really anything about ASP.NET itself. It's merely just to show how quickly you can get an initial ASP.NET Core webapp running through Docker.
If you don't know what Docker is, then their website is a great place to start.
As for ASP.NET Core, the key point about this verses the older versions of ASP.NET is that this version is cross platform - meaning you can run it on Linux and Mac as well as Windows - which is obviously huge when it comes to Docker and containers!
Introducing Yeoman!
Yeoman is a scaffolding tool to quickly create your initial project structure using recommended patterns. It supports many different technologies - eg. ASP.NET, AngularJS, etc.
We're going to use Yeoman and its ASP.NET Core Generator to quickly create our project. First though, let's install Yeoman ...
Installing Yeoman
To install Yeoman, first you need to have Node and NPM (Node Package Manager) installed. This can be installed by just downloading Node and installing it.
Once installed, open a command prompt and type the following commands to to install Yeoman, Bower, and the ASP.NET Core Generator ...
npm install -g yo
npm install -g bower
npm install -g generator-aspnet
Note that the -g part means that the package is being installed globally, so you don't need to do this for every project.
You're now ready to go, and can create new projects with a single command!
yo aspnet
This will then ask you which type of application you'd like to create ...
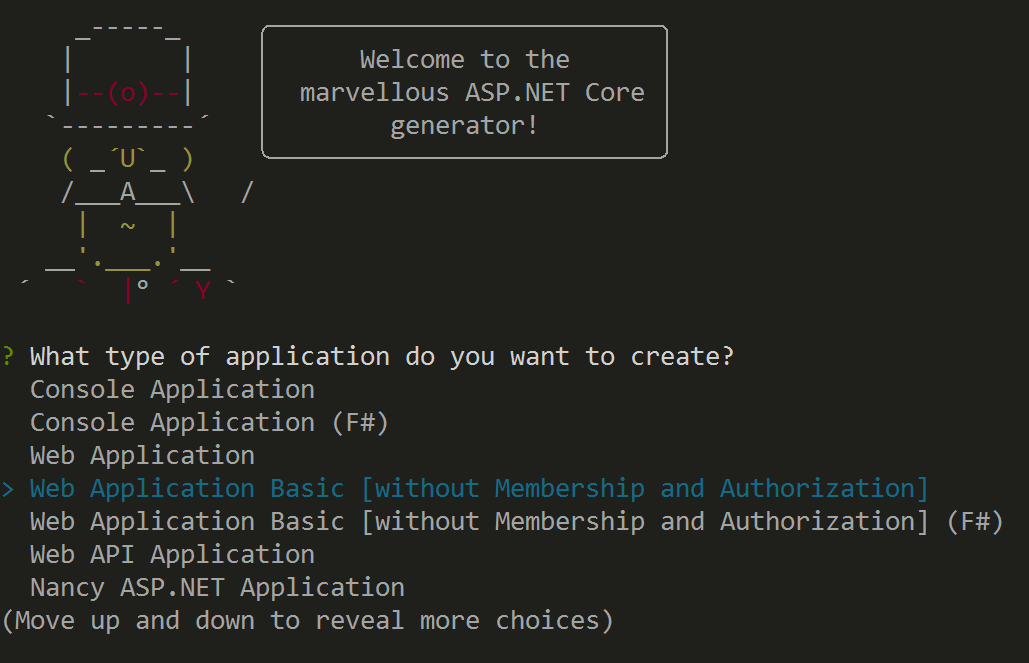
For this example, let's choose Web Application Basic [without Membership and Authorization].
After selecting that, you'll be prompted for the name of your application, and what UI library you'd like to use (Bootstrap or Semantic UI), and then it'll create your project for you.
At the end of the console output, it give you instructions on what to do next ...

After running those commands, you'll then be able to access your new shiny website via localhost. It'll be a non-standard port, and the console output will let you know the web address - in my case http://localhost:5000.
You can now load up the generated source code in your favorite editor, and hack away!
Added Docker to the equation
So to help us out even more, Yeoman has also created a DockerFile for us in the project root!
So as long as you have Docker for Windows installed and running, then you can just go to your project directory in a command prompt and type ...
docker build -t "exampleapp" .
This will build your Docker image. The -t let's you give the image a tag name. Once built, you can run it using ...
docker run -p 5000:5000 exampleapp
And you'll be greeted with a similar command line output as when you ran the steps above before we introduced Docker. The difference being that this is now running in a Docker container!
Docker Compose
Microservice style architectures are becoming more and more popular, which is what containers are ideal for. The thing about microservices, is that you tend to have more than one service! Plus you may have various 3rd party pieces of software - eg. a database, message bus, etc.
This is where Docker Compose becomes very useful. Instead of calling docker run (and the various command line arguments) manually to start each container, you can define all your containers in a docker-compose.yml file, which you can include in your source control system, and spin them all up with a single docker-compose up command.
First, let's move our webapp into its own sub-directory, so we can have our docker-compose.yml file in the root, and other sub-directories for any other services we decide to create. So the file structure might look something like this ...
<projectPath>\docker-compose.yml
<projectPath>\app\...
<projectPath>\api\...
... etc ...
Below is a very simple example of a Docker Compose file which will build and run our webapp, as well as spinning up a MongoDB container ...
exampleapp:
    build: app
    ports:
        - "5000:5000"
    volumes:
        - ./app:/app

mongodb:
    image: mongo
    ports:
        - "27017:27017"
So now just run:
docker-compose up
And Docker will do the rest! Obviously this is just a very simple example of a Docker Compose file. You can do so much more - like setting up virtual networking between containers, so only your specific containers are available to the outside world, and your database can be only accessible internally to specified containers.
I included MongoDB in the above example, just to demonstrate how easy it is to add 3rd party solutions to your project. You don't need to install anything - the above example will just pull down the relevant image from Docker Hub, and create a container from it.
You may notice that the example above has a volumes option. This maps a directory on your host machine (eg. your app folder with the source code in) to a directory on the container itself. This means that you can edit the code on your machine, and it'll still be reflected in the container.
Fixing file watcher polling
One issue I found when running the app through Docker, is that the file watcher didn't work by default. This means that if you change one of your code files, then refresh in your browser, it won't pick up the new changes.
To fix this, you'll need to add an additional line to your Dockerfile ...
ENV DOTNET_USE_POLLING_FILE_WATCHER=1
This should go before the RUN commands.
Once you rebuild your image, you'll be able to modify your code and have it immediately reflected when you refresh your browser window.
So how does Docker help us?
So far we've quickly created a webapp with Yeoman, and have demonstrated running it normally from the Windows command line, and also in a container. So what's the difference?
If this was a standalone webapp with no other dependencies or services, then the benefits are much smaller, and most likely not worth it. However, if you have multiple services and datastores, then the benefits can be quite large. Imagine setting up a new developer's machine, and not having to install various different pieces of software, eg. database, message bus, log store, etc. plus setting up your own services and IIS configurations. All you need to do is install Docker, then run docker-compose up in your project root folder, and that's it - the new developer can start coding straight away! Certainly a compelling argument in itself, and we haven't touched on the fact that it's a similar story when deploying to production! We've all heard the phrase "it works on my machine!" - well now it works on yours too!
Further reading
I was close to finishing this post, when I spotted in my RSS feed that Scott Hanselman had posted a related post on ASP.Net Core ...
Exploring ASP.NET Core with Docker in both Linux and Windows Containers
His post doesn't use Yeoman, but instead describes creating the project from Visual Studio and using the new Visual Studio Tools for Docker extension. He also talks about doing the same thing using the new Windows containers - which you now have with the Windows 10 Anniversary update!