Azure Advent Calendar video - Azure CLI and Cloudshell
Early on in September, I was having a conversation on Twitter with Gregor Suttie, and he mentioned that he and Richard Hooper were planning an Azure Advent Calendar this year, and asked if I was interested in participating. The plan being for members of the Azure community to each create a video about a particular topic in Azure. Then they'd publish 3 videos per each day of December on the Azure Advent Calendar YouTube channel.
This blog post covers all the details from my video for those who prefer to read rather than watch videos - otherwise, the video itself can be found here...
This is the first time I've ever recorded a video, but thanks to my recent MVP award, I'm now the proud owner of a Camtasia licence! So this was the perfect opportunity to play around with it, and I must say, it's a fantastic piece of software! So a huge thanks to TechSmith for helping MVPs share technical knowledge with this benefit.
When Greg and Richard officially announced the Azure Advent Calendar, the slots filled up pretty quickly. The main Azure Advent Calendar website initially started off as a blank table, but soon filled up with plenty of great Azure topics. I was lucky enough to grab a slot, and I chose to talk about the Azure CLI and Azure Cloudshell.
Terminal software and CLI Tips and Tricks
The first section of the video isn't actually about Azure at all! I thought it was worth covering some basics about getting a better command line experience before moving on to the Azure CLI. A lot of what I cover in the tips and tricks section is already covered in a blog post I wrote a couple of years ago, entitled Getting more from the Windows Command Line - so I won't repeat it here it all here, but here are the shortcuts I mention in the video that are worth knowing...
-
Ctrl-R (Bash and Powershell) - Reverse search history mode. This is the big one IMO, saving me a lot of time! You repeat a lot of commands you type, and also a lot of commands have multiple arguments. Ctrl-R lets you type a substring of a previous command, and cycle through past commands containing that substring.
-
Alt-period (Bash and Powershell) - Copies the last word of the previous command - useful more often than you'd think!
-
Ctrl-U (Bash), Escape (Powershell) - Clear current line. Bash clears left of cursor, Powershell clears all of the current line.
-
Ctrl-L (Bash and Powershell) - Clear screen
Also, in the above-mentioned blog post, I talk about a 3rd-party tool called ConEmu. This adds various additional functionality to the command line - eg. multiple tabs, split-screen support, plus a lot of different customisations. Since then, I've switched twice. First to another tool called Cmder, which is literally just a heavily customised version of ConEmu that's shipped under a different product name. Then more recently, I've switched to the new Windows Terminal.
I'm now primarily using the new Windows Terminal, and love it! They're constantly iterating on and improving it all the time. It supports multiple-tabs, tmux-style splitscreen, has Azure Cloudshell itself as one of the shells you can choose (demoed in video and mentioned later in this post), plus plenty of other customisations. There's even a really cool promo-video that Microsoft produced...
I love the effort that they've put into a video for an open-source command line tool! Pretty much what you'd expect from an advert for a SurfaceBook, not a CLI tool! :) I think I've watched this video about 100 times now. If you look closely, when it flicks through all the older terminal windows near the end - the usernames in the path are real people (I believe the developers?). I first saw this video earlier this month at our .NET Oxford lightning talk meetup where Stuart Leeks did a talk on WSL2 (this has been recorded, so I'll update with a link here when it's published).
I also mention in the video that the Windows Terminal comes with a new font from Microsoft called Cascadia Code. This can also be downloaded separately. I've become a huge fan of this font, and use it across all my CLIs, IDEs, and editors.
Installing the Azure CLI
So, I was much further into the video than I initially expected before actually talking about anything Azure related!! The above-mentioned tips and tricks was only meant to be a short section, but became much longer. So apologies to those who found this section a bit long and just wanted to hear about the Azure CLI and Cloudshell!
Without further ado, let's start with installing the CLI. The first result when Googling for 'azure cli', is this page, which gives you a list of install pages per operating system. Windows gives you an MSI installer to download, Mac gives you a Homebrew command, Linux gives you apt-get, yum, etc commands. You can even just run it in Docker. It's really simple and quick to install - and once installed, you can open a command prompt and type az to check it's installed.
Authentication
The first thing you'll want to do is connect with your Azure account. This is as simple as typing az login. You'll be redirected to a browser page where you can login to your Microsoft account. As soon as you login, you'll be prompted with a message saying you can close that browser tab. Going back your terminal, you should now be logged in.
Then to choose which subscription you want to default to, you can do az account set --subscription <subscription name or id>.
Exploring with the Azure CLI
I obviously don't have time in the video to go through all the commands, as that would be impossible. So I more wanted to show how to find your own way around the Azure CLI.
The first step is just to type az without any arguments. This will give a long list of Azure resource types you can interact with - eg. 'webapp', 'vm', 'cosmosdb', etc, etc. This is the best starting point.
Say for example, you want to work with webapps, you can then type az webapp -h. The -h will show help in the context of what you've typed so far - so in this example, it'll show help for what comes after az webapp ....
The typical format for the az commands is az <noun> <verb>. Where the noun is the resource type you're interacting with, and the verb is the action you want to perform - eg. 'list', 'create', delete', etc. So if I want to list my webapps, I can do az webapp list. If I wanted to create a webapp, I can do az webapp create -h to get help on what other arguments I need to create the webapp.
One thing to note is that a lot of the arguments have a long version of the name, and a short version. A general convention (which is used in a lot of other CLI tools too), is to have two hyphens for the long name, and a single hyphen for the short name. Eg. --resource-group or -g.
Changing the default output format
By default, the output of the commands (eg. az webapp list) is quite verbose JSON format. Whilst this is useful sometimes, I personally find that more often than not, I just want a basic list. You can explicitly specify the output type to be table format like this: az webapp list -o table. But to change the default, you can edit your config file, which should be in your user folder: C:\Users\<username>\.azure\config (or /home/<username>/.azure/config in Linux). Just add the line output = table to the existing [core] block (or create that block if it doesn't already exist). Then it'll default to table output, and if you do need JSON, you can do az webapp list -o json.
Filtering the output with JMESPath
I knew you could filter the output, but I didn't realise it was called 'Jmes path' until James World mentioned it in conversation after the last Azure Oxford meetup. I thought he was joking initially when he asked if I'd heard of James Path :) But it turns out it's a widely used query language for JSON - I'm not sure how I hadn't heard of this! It's even got it's own webpage full of examples.
If you type az webapp list -h, the help output even gives a couple of examples...
List default host name and state for all web apps: az webapp list --query "[].{hostName: defaultHostName, state: state}"
List all running web apps: az webapp list --query "[?state=='Running']"
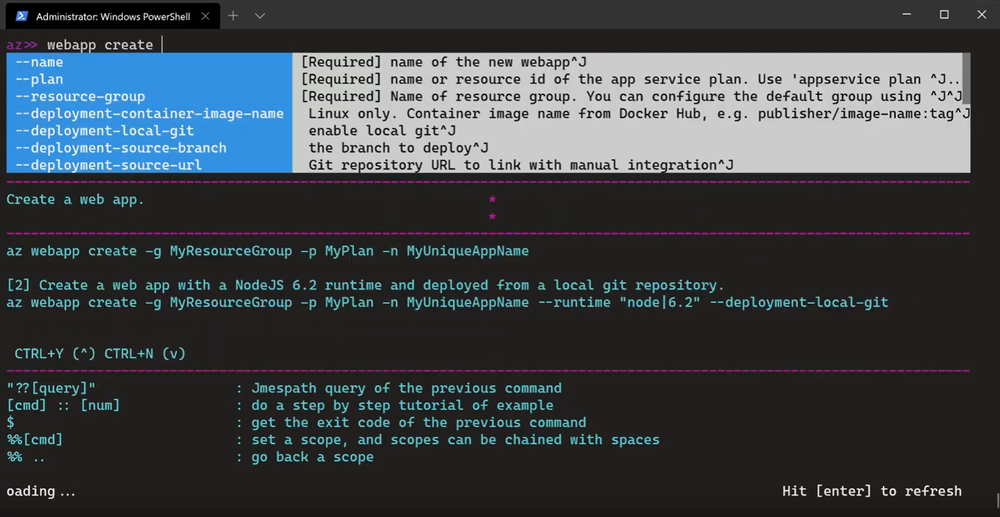
Interactive Mode
There's also something called 'interactive mode'. If you type az interactive, you'll get a clunky-looking text-based CLI GUI. This will give you intellisense as you type...
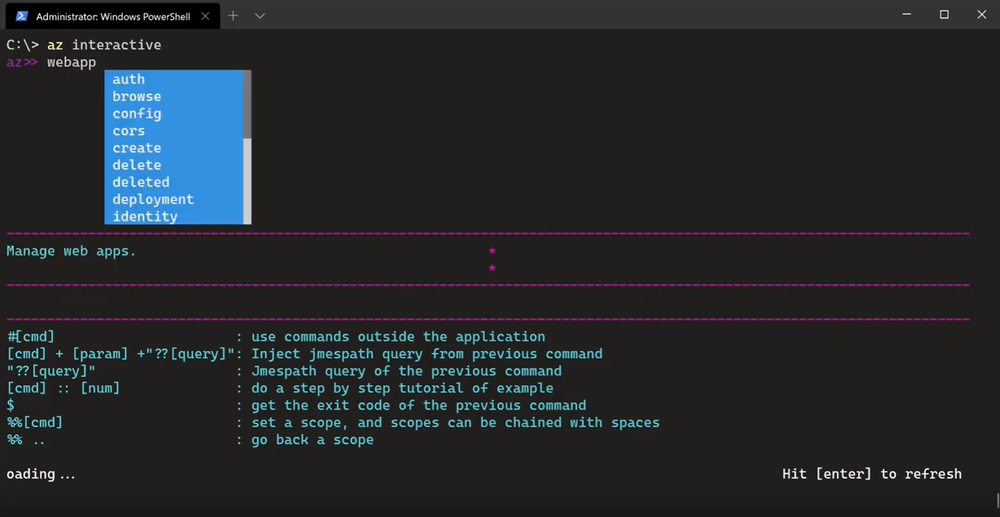
You'll also get basic help text on the various arguments (pretty much what you'd get if you type -h against the command you're working with).
Visual Studio Code extension
As I mentioned above, I find the interactive-mode UI a bit clunky. I much prefer using the VSCode extension, Azure CLI Tools, which gives also gives you intellisense and help text in the editor. My video shows this in action (see 17m25s in).
Azure Cloudshell
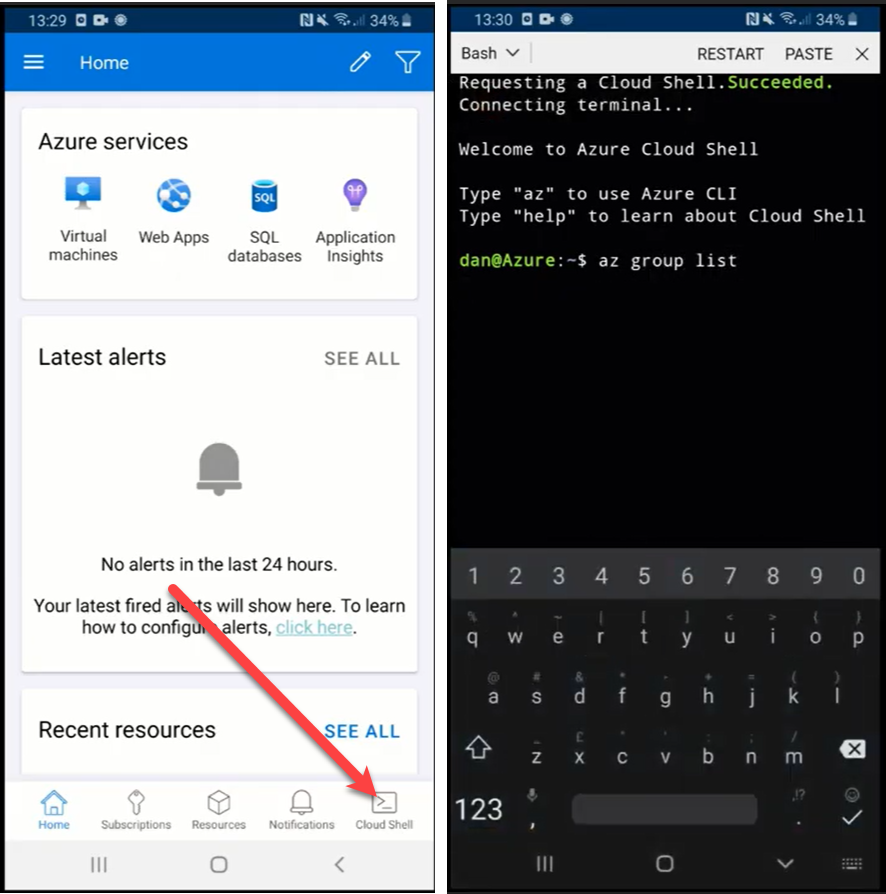
Next in the video, I showed the Azure Cloud Shell. If you open up the Azure portal in your browser, you'll see there's an icon (#1 in the screenshot) on the top navbar...
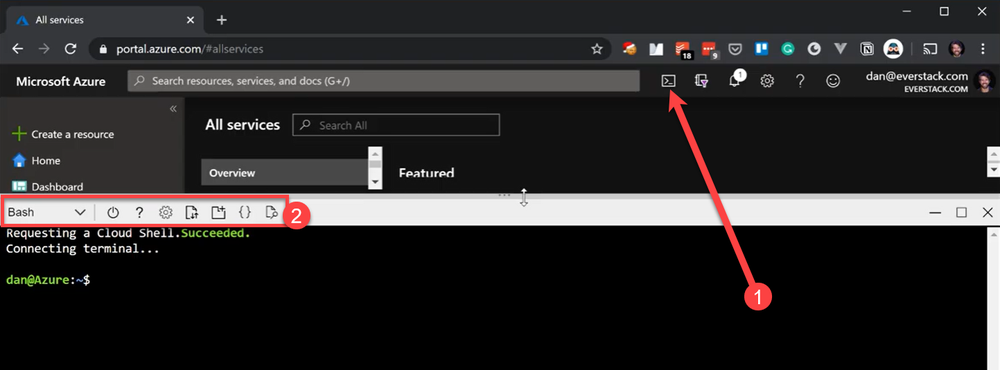
If this is the first time you've done this - you'll be prompted to create Azure storage, which is used to persist the session data.
Looking at the Cloudshell toolbar (#2 in the screenshot above), you can see various options. You can choose between Bash and Powershell. You can customize the text font and size (although, the font choice is quite limited, and sadly doesn't include Cascadia Code!). You can upload/download files. There's also an icon to open vscode within Cloudshell!...
Or you can run vscode via the command line, as you would locally... code ..
When using Cloudshell, you're already signed into your Azure account, which means you don't need to do the login step mentioned above. You also get very basic tab-autocompletion. It's a bit slow though, but better than nothing!
Cloudshell within Windows Terminal
The above-mentioned Windows Terminal also allows you to open an inline Cloud Shell instance...

This gives you a remote instance of Azure Cloudshell, but acting as though you were running a local CLI. If you do a directory listing here, it'll show the remote directory listing, just as it would do in the browser-based Azure Cloudshell. You also get the same basic tab-autocompletion.
Cloudshell within the Azure mobile application!
If all that wasn't enough - you can also access Cloudshell from your mobile phone whilst out and about from the Azure Mobile App!...
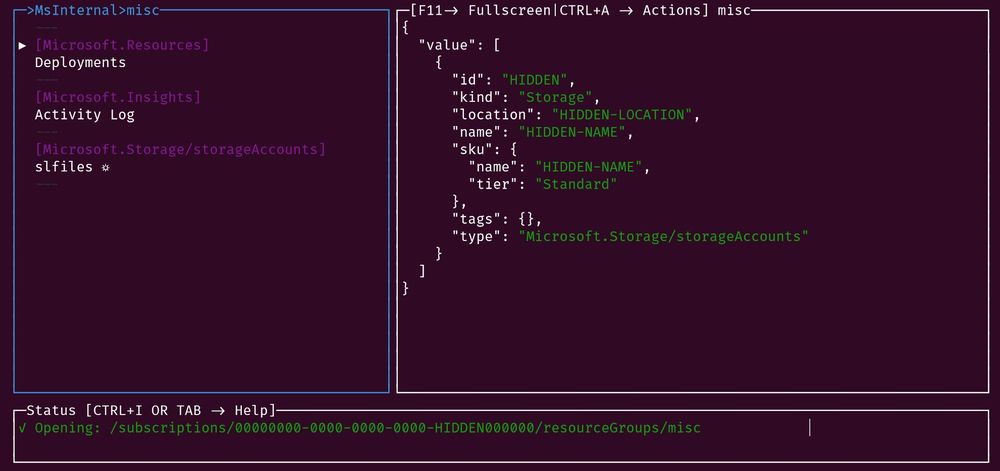
Bonus: azbrowse
The final thing I cover in the video, is a tool that Stuart Leeks told me about earlier this month. Azbrowse is a CLI-based tool (text-based GUI) that let's you quickly navigate through and edit your Azure resources. It's much easier to demo rather than explain in text, so check out the animated gifs Stuart created on the Getting Started page, or watch the demo in my video (see 22m36 seconds in).
Wrapping up...
I hope you enjoyed both the video and this blog post! If you did, please like the video and retweet. Also, any feedback is greatly appreciated! Positive or negative - either way helps me learn and improve over time. This is my first video after all! :)
Today, it's my turn in the #AzureAdventCalendar! I talk about the CLI, #WindowsTerminal, #AzureCLI, #AzureCloudshell, and much more! I've also written a blog post which covers everything from the video. Enjoy! :) https://t.co/J9TrTfPDRV https://t.co/HcpjSCvGE3 #azure #mvpbuzz pic.twitter.com/gsOTGrHQOJ
— Dan Clarke (@dracan) December 20, 2019
Comments